Have you ever seen the cue ball, after contacting the object ball, pick up speed and continue going forward? The follow shot seems to defy logic, but it is extremely easy to implement once you know the secrets. As you read below, I will break down these secrets so any player with a little practice will be a master of the follow shot.
The follow shot is a quite common shot in any billiard game and has many use cases, whether that may be to get position for your next shot, or to break up a cluster of balls. To implement a follow shot all that is required is a good stroke and a proper contact point on the cue ball. As with anything in life, the only way to become a master is with tons of practice and dedication, but if you follow these secrets and practice drills that I have put together for you, you will be a master in no time.
I am sure you have tons of questions and are excited to begin your journey to improving your skills on the pool table. I will try to answer any questions you may have below, so let us not waste any more time, and let me show you how to become a master of the draw shot.
What Is A Follow Shot?
Follow shots are an important skill to have in your arsenal of shots. You will use them all the time to position to the cue ball. From small follow shots just forward a few inches to across the table with a power follow shot. Okay so you are probably asking yourself well what exactly a follow shot is and how to implement one.
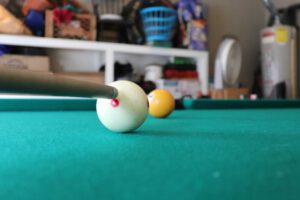
A follow shot is when you hit the cue ball well above the center. The cue ball will have forward spin on it which will cause the cue ball to continue rolling forward after contacting the object ball (or following the object ball). The spin on the cue ball will affect the tangent line. The tangent line (imaginary line that you draw out from where the cue ball and object ball meet) is where the cue ball will travel after contacting the object ball if no spin is on the cue ball. Using follow will affect this line as well as using English, but the follow (or forward spin) will move the line away you.
Once contact is made the cue ball will begin to follow the tangent line then the forward spin will begin to take affect and will move the cue ball across the tangent line. The harder the ball is struck the greater distance the ball will travel down the tangent line before the forward spin will take effect.
Much like a draw shot, the follow shot will need practice to perfect. The speed and power of the shot will also depend on how far away the cue ball is from the object ball, as well as how far you are wanting the cue ball to roll forward after contacting the object ball.
The Proper Technique
Before you learn how to master the follow shot, make sure you know the fundamentals such as the proper stance, how to grip the cue, what bridge to use, as well as how to do a proper stroke and follow through. Assuming you are still hear reading, I will expect you to know the fundamentals.
Here are some quick tips for achieving the follow shot:
- Make sure your tip is shaped well and is always chalked before trying a follow shot.
- Keep the cue as parallel to the table as possible.
- Hit as high on the cue ball as you can without miscuing.
- Use a closed bridge whenever possible to help control the cue’s contact position on the cue ball.
- On your stroke, make sure to follow through the cue ball and do not drop your elbow.
- Keep grip hand loose and smoothly accelerate your stroke.
- Finish your stroke all the way and do not jerk the cue back.
The trick to these shots is to aim as High as possible on the cue ball, but also keep the cue as parallel to the table as the shot permits. You do not want to be bringing your cue tip upwards in the stroke your cue should remain parallel throughout the entirety of the stroke. The most important tip to achieving the follow shot all boils down to the follow through of the stroke. You cannot just jab at the ball and expect much action on the ball.
Another trick to help with getting more spin on the cue ball is to pay attention to how far away the tip of the cue is from the object ball before you start your stroke. A good ideal distance is the size of a cube of chalk. Having a shorter distance is key to achieving maximum spin by allowing you to follow through the cue ball much further applying even more spin on the cue ball.
The follow through is crucial to achieving the forward spin on the ball. I see a lot of players when first learning this shot trying to hit the shot way to hard, a good follow shot has nothing to do with power of the shot but all to do with the speed of the stroke as well as how high on the cue ball the contact is made. It is the speed that the cue ball is spinning which affects how much distance the cue ball will travel after hitting the object ball.
Understanding the Physics of Follow Shots
So, what is happening during a follow shot that causes the cue ball to pick up speed after contacting the object ball? I am going to try to explain this without getting too technical. There are several factors to consider when determining what causes the follow action and they are the tip offset (how far off the center the tip contacts the cue ball), the stroke speed, power of the stroke, distance between the cue ball and the object ball, and finally the condition of the cloth on the table.
For example, when you hit the cue ball in the center, the cue ball will not apply any spin to the cue ball but will rather slide across the cloth of the table. This is considering that the distance between the cue ball and object ball isn’t far away, the farther away it is the more time the cue ball has to slow down its spinning due to the friction from the cloth. To overcome this challenge, more power is required from the stroke to power through the distance.
When trying to understand the follow shot there are two things you will always have to take into count, which are the speed of the shot and the distance it must travel. The higher from the center of the cue ball that you aim and the speed at which the ball is stroke will determine how much forward spin will be applied. The more forward spin that is applied the further the distance between the cue ball and object ball will still allow for full follow action to be achieved.
These same two factors will also determine the distance of the follow action (how far forwards will the cue ball go after contacting the object ball). So basically, the amount of spin on the cue ball minus the distance between the cue ball and object ball will determine how far forward from the object ball the cue ball will travel. The greater the distance the more speed and power the shot will need to achieve the same amount of follow action.
The Types of Follow Shots
There are two main types of follow shots, although they are not really different types but rather, they have different reactions, the center follow shots and follow shots with English (or sidespin). These two types will have drastic differences in the way the cue ball will react once it hits the object ball.
In order to get a follow shot to follow the object ball straight forward it requires two things, one being a high center hit on the cue ball, and two being a straight shot, meaning the center of the cue ball will hit the center of the object ball. If the point of contact with the object ball is off center it will throw the cue ball off at an angle.
Using English in combination with your follow shot will offer more opportunities for position play as well as the ability to manipulate the angle at which the object ball will travel after being contacted by cue ball. Being able to apply sidespin on top off the forward spin, will affect the way the object ball will react when contact is made, the side spin will transfer the reverse spin onto the object ball.
When to Use A Follow Shot
There are many reasons to use follow shots in any game of billiards, but they all boil down to controlling where the cue ball will go after contacting the object ball. You can use follow shots for position play meaning to set up for your next shot. Another common use for the follow shot is breaking up a cluster of balls to hopefully set yourself up for a good run of the table taking out any trouble areas that may occur in any billiard game.
Follow shots should be used more often than draw shots most of the time, depending on the needs of the shot. They are easier to control and manipulate more consistently with less effort. Lets say you have a straight shot lined up, but in order to get in a good position for you next shot you need to get the cue ball on the opposite side of the table. To do this with a draw will require perfect precision with the stroke with enough backspin to travel across the table. If you would use a follow shot instead to get in the same position you could easily use the forward spin to bounce off the rail to get back across the table.
Follow shots are great for breaking up clusters of balls because depending on the power of the stroke you can manipulate the tangent line controlling where the cue ball will go after contacting the object ball. Compared to using a draw shot for breaking up the cluster, less energy is wasted (you are traveling with the force of the stroke versus traveling against) which means more power is transferred to the clustered balls, which will most likely leave you in a better situation to run the table.
Drills to Practice the Follow Shot
Now that I have explained to you what a follow shot is, how it can be helpful, and that you need a lot of practice to perfect. You will need to know some practice drills so you can become a master as well. There are tons of drills that can help you with all your fundamentals, but if we are just going to work on follow shots, I have a few favorite practice drills to challenge you.
Practice Drill #1:
For this drill we are going to work on the controlling the follow shot and getting a feeling for how much speed and power is needed for not only achieving a follow from multiple distances between cue ball and object ball, but also controlling how much distance we achieve from the follow shot off the object ball. To get started pick a long side of the table that is easiest for you to shoot on, whether you are right-handed or left-handed will decide this for you.
We are going to be using the diamonds on the table to measure distances and control where we are putting the balls. I am going to break down this drill into multiple levels, to make the most of this practice drill, you must follow the rules. In order to advance to the next level of this drill you must be able to complete each follow exercise ten consecutive times, meaning ten times in a row without messing up. Let the learning begin!
Level 1
So, to get started, begin by getting set up:
- Place the object ball at the first diamond from a corner pocket on the desired side of the table.
- Place your cue ball on the second diamond.
- Align both the cue ball and object ball to sit off the rail about the length of a cube of chalk.
Now that you are set up, the object of this drill is to hit the object ball in the corner pocket and follow the object ball into the pocket.
This will take some practice to get the cue ball to follow the object ball into the pocket as it requires precise accuracy of aligning the cue ball and object ball up and making sure to hit the cue ball high but aligned in the dead center to prevent any sidespin from occurring. roll straight back and to get the speed down to control exactly how far the draw action will bring the cue ball. If any side spin is put on this shot it will cause the cue ball to drift off course and you will not be able to pocket it.
This drill will be challenging, but well worth it because it not only works on your follow shot but also on your stroke and making sure where you hit the cue ball is where you intended. Once you have mastered this level, meaning you have completed the challenge of getting this follow shot to follow the object ball into the pocket ten times in a row, we will move to level 2.
Level 2
Congrats on completing level 1, I know that it was probably frustrating but know that you are making tons of progress with each level you go through.
Now lets begin level 2, to get started, begin by getting set up:
- Place the object ball at the second diamond from a corner pocket on the desired side of the table.
- Place your cue ball on the third diamond.
- Align both the cue ball and object ball to sit off the rail about the length of a cube of chalk.
This level of the challenge will be harder than the first by increasing the distance of the follow from the first diamond to the second. Do not give up, nothing in life that will improve your skills is easy at first but over time it will become easier. This challenge is the same as before, you must complete this exercise 10 consecutive times before moving on to the next level.
Level 3
Congrats on completing level 2, you are beginning to get comfortable with follow shots with the distance between the cue ball and object ball at a diamond’s length. Now lets change this up so you can get use to varying distances.
To get started, begin by getting setup:
- Place the object ball at the first diamond from a corner pocket on the desired side of the table.
- Place your cue ball on the third diamond.
- Align both the cue ball and object ball to sit off the rail about the length of a cube of chalk.
The object of this level is to increase the distance between the cue ball and object ball from one diamond’s length to two. You may be surprised that adding this distance will have such an effect on your ability to follow the same distance. For this challenge I want you to begin by following the object ball into the pocket starting at the third diamond 10 times in a row.
Once you have finished this level, congrats on completing this challenge. This is a great challenge to do regularly every so often to brush up on your follow skills. By using the diamonds to judge the distance this will help you in any game by allowing you to relate the distance you want to achieve by using the diamonds as a reference.
There is so many ways you can add to this challenge by increasing the distances of the follow, increasing distances between cue ball and object ball. You could try half diamond follows which are great for small position plays. It’s good to experiment with this as it allows you to subconsciously program your brain to know how hard and fast you need to hit the cue ball to get the desired distance you want out of your follow.
These drills should be repeated regularly in order to grow and maintain your skills. I hope you have found this article to be helpful, and I wish you all the very best in your progress to becoming the next a pool master.


